QuickBooks Online is a widely used software that helps to streamline complex finance and account-related tasks. Moreover, it also provides the feature to create journal entries to ensure accurate record-keeping. Additionally, by creating the journal entry in QBO, users can get complete details regarding the movement of funds and assets. However, to gain more insights regarding how to create journal entry in QuickBooks Online, view, delete or import, you must stick to this post.
Why Is There a Need to Create a Journal Entry in QuickBooks Online?
The users must create a journal entry in QuickBooks Online for the following reasons.
- You can easily transfer the money between income and expense accounts.
- Users can manually add debit and credit amounts by creating a journal entry, as in traditional accounting systems.
- It also enables you to shift the money from an asset, liability, or equity account to an income or expense account.
Here’s How to Create Journal Entry in QuickBooks Online Instantly
Are you seeking the proper procedure to create journal entries in QuickBooks Online? If yes, then you no longer need to worry. All you need is to perform the steps elaborated below to get the desired outcome.

- Initiate the process by tapping the “+” New icon and then choosing the Journal Entry option.
- You are supposed to pick the account from the Account field. However, if you want to debit or credit the account, mention the amount within the accurate column to move further.
- After this, choose another account to or from which you wish to shift your money. However, depending on whether you have inserted the debit or credit on the first line, you should include the same amount within the opposite column.
- Now, you must review both accounts and cross-check that the same amount is in the Credit column on one line and the Debit column on the other side. This will reflect that your accounts are balanced properly.
- Next, the users need to mention the accurate details in the memo section to make you aware of why you have generated the journal entry.
- After adding all the details accurately, hit the Save and New or Save and Close button.
Detail Procedure to Make a Transaction Journal Entry in QuickBooks Online
In this blog section, we have described the stepwise instructions for making a transaction journal entry in QuickBooks Online.
- Initially, log into your QuickBooks Online account and move to the Transaction menu > Journal Entry tab.
- Afterwards, include the Transaction Date within the accurate Date column of the Journal Entry page.
- Soon after this, you are supposed to mention the description related to your transaction within the Description field column.
- Theron clicks the Account Drop-Down menu and selects Accounts, impacting the transaction journal entry.
- Now, the users must complete the fields accurately using the Debit and Credit amounts. Once you have filled all the details properly, hit the Add Line button to attach more lines and insert Journal Entry QuickBooks Online.
- In the end, tap the Save button after completing the above steps.
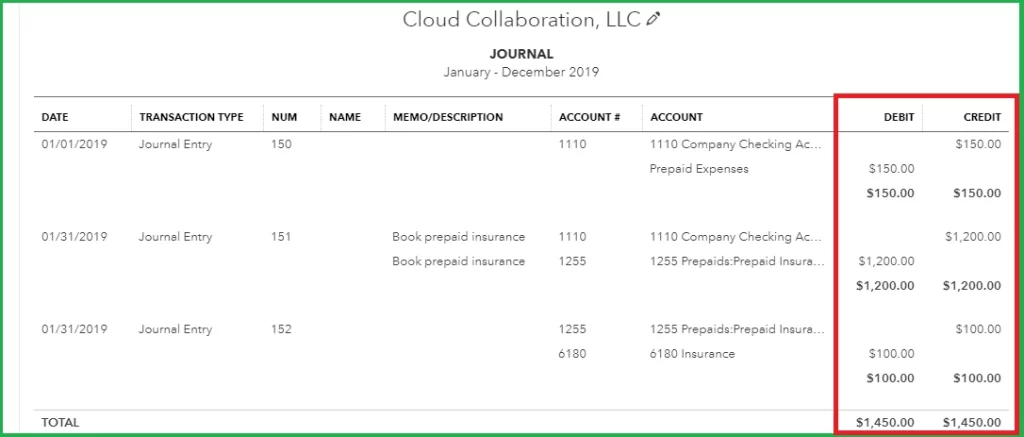
Learn More About How to View a Journal Entry in QuickBooks Online
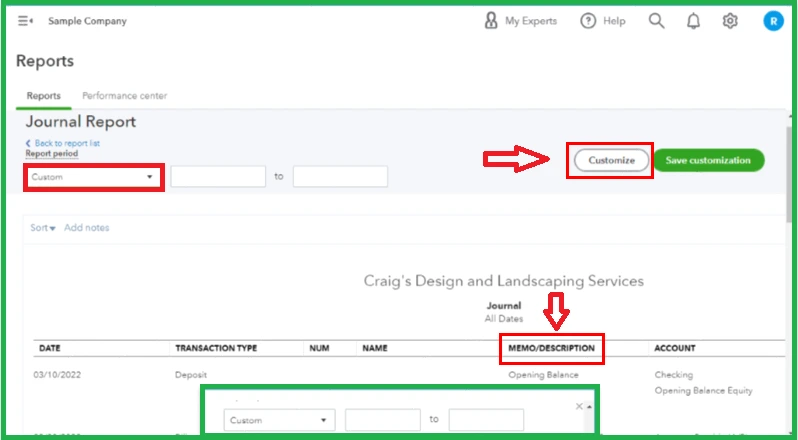
After creating, it’s high time to view a journal entry in QuickBooks Online to spot all the transactions that have been added properly. Below, we have listed the proper stepwise instructions to view the journal entry accurately.
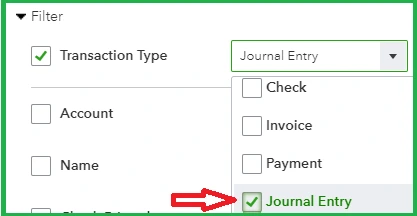
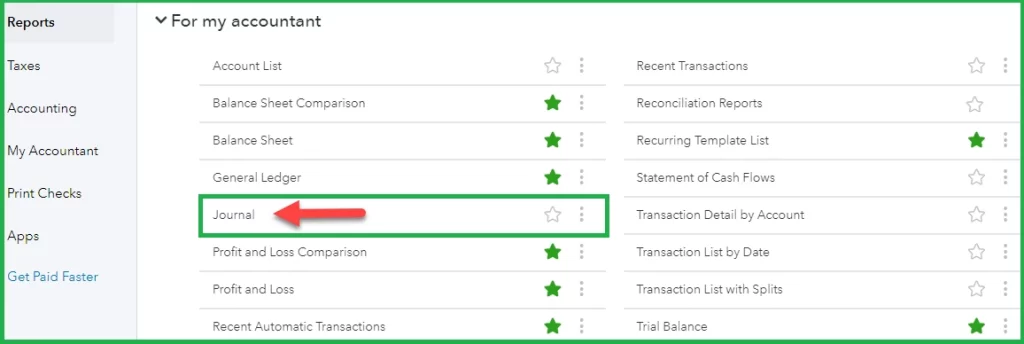
- To start the process, choose the Reports menu from the left panel.
- Afterwards, the users must search for the Journal tab from the particular search column.
- Subsequently, hit the drop-down menu of “Month-To-Date,” located beneath the Particular Report period.
- Later on, tap on the highlighted Custom option and modify the Date Range for the ending as well as the beginning for which you want to search for the journal entries of that specified date.
- Now, you must click anywhere on the Particular page to update the required report. This will help you view a journal entry in QuickBooks Online.
Procedure to Generate Multiple Journal Entries in QuickBooks Online
To generate and enter journal entries in QuickBooks Online, follow the following steps. Look at the procedure described below closely to easily generate multiple journal entries.
- First, log in to your QuickBooks Online account and choose the Transactions menu, followed by Journal Entry.
- Afterwards, navigate to the Date box from the Journal Entry Page and accurately mention the date of the first transaction in the search area.
- You must navigate to the Description field and accurately add your first transaction’s description into the respective text field.
- Thereon, hit the Account Drop-down menu and pick the account hampered by your first transaction.
- Next, the users must properly provide the details and accurate debit and credit amounts.
- However, you must repeat the above steps for additional transactions and hit the Add Line alternative option.
- Once you are sorted, select the highlighted Save button to finish the entire process.
What’s the Process to Import Journal Entries in QuickBooks Online?
The following are the steps to import journal entries into QuickBooks Online.
First step: Get Ready With Your Spreadsheet-
Before trying to import the journal entries in QuickBooks Online, the users must cross-check that everything mentioned in the spreadsheet is accurate.
- First of all, the users must verify that their file contains at least any of the information, including Journal No, Journal Date, Journal Code, Account Name, Journal, Debits, Credits, and Select date formats.
- However, if you notice that your spreadsheet contains any new accounts, including them with your charts of accounts is important before importing. To add them to the charts of accounts, use the steps below.
- Initially, move to Settings > Charts of Accounts and tap the New option to establish a new account.
- You must pick an account type and the detail type that best fits the transaction you wish to monitor.
- Thereon, assign a new name to the account and mention the description with them.
- However, if you spot that it is a subaccount of the previous account, then use the Is Subaccount option and include the parent account.
- You must confirm that the account in QB tallies with your real-life bank or credit card account. Later, insert the amount in the account and recognize the As of date. You must also mention today’s date if you wish to begin the tracking process instantly.
- After making all the necessary changes, opt for the Save and Close button.
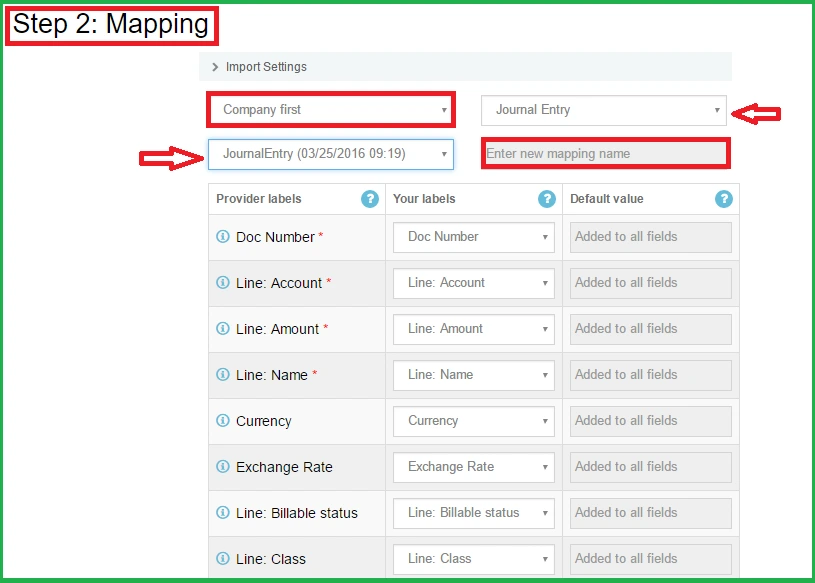
Second Step: Try to Import Your Journal Entries
Users can switch on the class tracking feature to import journal entries and classes.
- In the first phase, navigate to the Settings menu and click the Import Data option.
- After this, choose the highlighted Journal Entries to proceed further.
- Thereon, you must land on the Download page and select the Browse option.
Note: If you need assistance formatting the journal entries, choose the Download a Sample File option.
- Soon after this, look for your CSV or Excel file and opt for the Open button.
- Afterwards, you must try to map your information. You will notice that the Field section will reflect the headers on the spreadsheet, and from every small arrow icon, opt for the one that tallies with the field present in the QBO application.
- You must hit the Next button and modify the file when you spot any issue.
- In the next step, tap the Start Import option and then Done.
- After completing the above steps, access the “Use the Search” function to verify and modify the journal entries.
Here’s How to Delete Journal Entry in QuickBooks Online Effortlessly
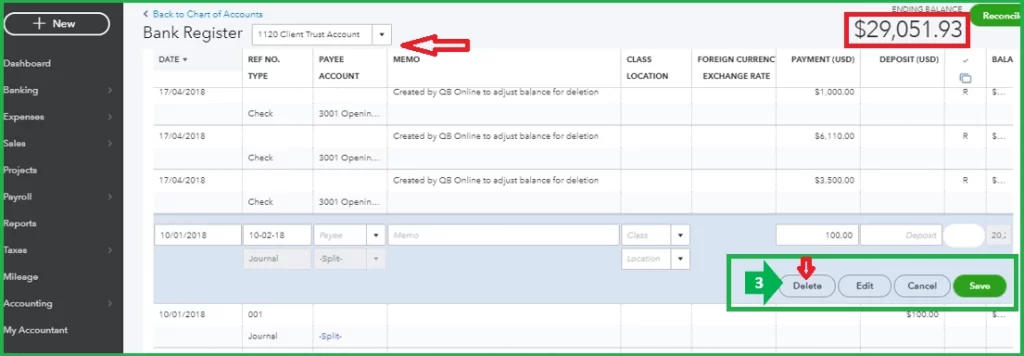
There might be certain instances when users accidentally generate the journal entry. So, they want to delete journal entry in QuickBooks Online to remove them permanently. Before deleting the entry, you must confirm whether you wish to erase it or not, as it could unbalance your accounts. Furthermore, we have elaborated the stepwise instructions to accomplish the process.
- To delete the journal entry, first browse to Settings > Charts of Accounts option.
- After that, look for the account for which you have generated the journal entry and hit the Account History option.
- You are supposed to search for the journal entry in the account register. Herein, you will notice that the word “Journal” must be listed in the Ref No or Type Column.
- Thereon, pick the journal entry to get more details about the transaction and then hit the Delete button.
- Ultimately, choose the Yes button to confirm your wish to delete the journal entry.
Ending Words!!
With the help of this informative guide you can easily view the journal entry in QuickBooks Online. However, if you are seeking additional help, you can consult our QB professionals and resolve your issue quickly. The experts will assist you in the best possible manner.
Frequently Asked Questions
Ans. You must perform the following steps to reverse a journal entry in QuickBooks Online.
- Firstly, navigate to the Settings menu > Charts of Accounts and look for the account for which you established the journal entry. Later, choose the Account History option.
- After this, look for the journal entry in the account register and choose it to expand. Later, hit the Edit menu.
- Thereon, browse to the Reverse option and then Save.
Ans. The users must follow the instructions to view the old journal entries in QuickBooks.
- To start the process, choose the Create icon from the top-right corner.
- Afterwards, move to the Journal Entry and tap on the icon with a Counter-clockwise arrow.
- You are supposed to hit the View More option, and then you can easily view the old journal entries in QuickBooks.
Ans. It has been suggested that you must review the journal entries in QBO regularly or monthly. As a result, it will help you determine whether there are any discrepancies so that you can fix them earlier to get accurate financial reporting.
Ans. You can run a report on journal entries by choosing the Reports menu and then Accountant Reports. After this, browse the Journal option and modify the reports to get the required information.
Ans. The journal entries in QuickBooks Online are mainly generated to keep the accounts balanced. However, if the accounts don’t balance, you will receive an error message. In that scenario, you must cross-check the entries you entered to ensure accuracy.