If you are looking for a helpful post on how to add clients to QuickBooks Online Accountant, pat your back for finding the right one.
Getting a client is always awesome, no matter what you do. However, if you are an accountant, you can add clients to QuickBooks and manage their bookkeeping tasks. Besides, adding clients to your firm also lets you have their info handy. Besides, those customers who already have QuickBooks can invite you to become their accountant. If you are not aware of the steps to add a QuickBooks Online client, this post will guide you through the procedures through which you can get this done. Let’s start
About QuickBooks Online Accountant
QuickBooks Online Accountant is a web-based solution devised for accountants and bookkeepers who handle multiple clients. It lets them collaborate with their clients with the utmost convenience. Besides, it lets accountants manage their clients on the user-friendly interface of the QuickBooks Online application.
Thus, you can do so much on a single platform, such as handling clients’ financial data, creating reports, managing transactions, and much more. You can seamlessly collaborate with your clients and simplify the workflow with ease of communication.
You can sign up for QuickBooks Online Accountant with the utmost ease by entering some basic info, such as name, email, and company name. After completing the registration, you are all set to move ahead with the required process. Thereafter, you can access your account on your preferred devices with a stable Internet connection and enter the accurate login credentials.
How Can I Add Clients to QuickBooks Online Accountant?
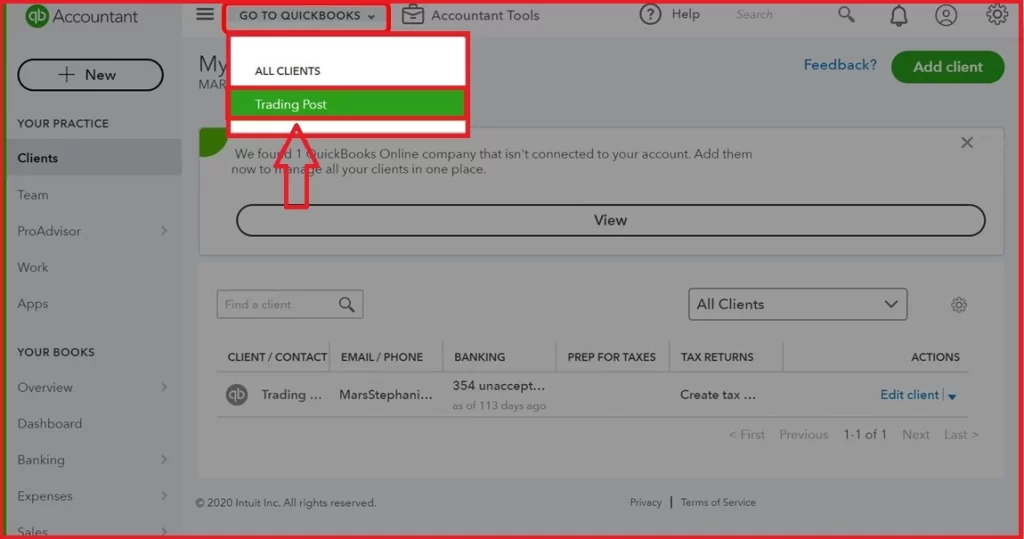
Now that you are aware of the product, we can proceed further with the steps to add clients to your QuickBooks Online Accountant. There are different scenarios while adding clients to the program, as stated below with their relevant steps:
Adding Clients Who Are Already Using QuickBooks
If your client is already using QuickBooks Online or Self-Employed, they can send you an invitation link for to to become their accountant. Below is how it works:
- Share your email address with your client and ask them to send the invitation link on the same.
- Once they send you the link, open the invitation email and click on the Accept Invitation link.
- Using the given link, sign in using the accurate login credentials (username and password).
- In case you have different QuickBooks Online Accountant firms, choose the most suitable one for your client.
After connecting the invitation, QuickBooks automatically connects your client’s account to your QuickBooks Online Accountant firm and adds them to your client’s list. Once they are added, you can review their financial records and make modifications to them.
Adding Clients Under the ProAdvisor Preferred Pricing plan
ProAdvisor Preferred Pricing plan is designed for the QuickBooks ProAdvisors. If you are an Intuit-certified ProAdvisor, you can take advantage of this plan. You can provide the best long-term pricing plan for your clients and set them up. If your Self-Employed or QuickBooks Online users want to become a part of this plan, you can transfer their subscription.
When any of the below-given product subscriptions are linked to QuickBooks Online, you can add them to your ProAdvisor Preferred Pricing Program:
- QuickBooks Online Contractor Direct Deposit
- QuickBooks Live Bookkeeping
- FormFly
How To Add Clients Who Are New To QuickBooks?
If the client you want to add is completely new to the QuickBooks Online application, you can add customers in different scenarios. You can add those who want to be a part of your ProAdvisor Preferred Pricing plan or also those who are willing to pay their own subscription to QuickBooks. Below are the steps for two different scenarios, one after the other:
1: Adding Clients Under Your ProAdvisor Preferred Pricing Plan
You can add clients to your particular ProAdvisor Preferred Pricing Plan in the first place and then subscribe to the QuickBooks Online application for them. It will also enable you to choose the best products that align perfectly with your specific needs. Below is how you can add clients to your ProAdvisor Preferred Pricing plan:
- When in the QuickBooks section, choose ProAdvisor discount to include your client under your ProAdvisor Preferred Pricing Plan.
- In every given section, you need to check the payroll products and QuickBooks products. In case your clients need a payroll product, you need to check and confirm that it is covered under your ProAdvisor Preferred Pricing Plan.
- Thereafter, you can choose the suitable product you wish to subscribe your specific client to.
- Also, mark the checkbox for the Make Me the Primary Admin option.
- Once everything is considered, hit the Save button to finish.
2: Adding Clients Willing To Pay For Their Own Subscription to QuickBooks
To add a QuickBooks Online client who is willing to pay their own subscription price for QuickBooks Online, you need to consider a few things. You can provide clients with a direct discount and let them handle their subscriptions and billing independently. These steps will help you in your progression:
- First things first, go to the QuickBooks section and select the Direct Discount option. Thus, you can provide discounts to your clients. However, they will have to pay for the QuickBooks subscription on their own.
- Checkmark the box against the Primary Admin option if you want to take care of the admin tasks for your client.
- After choosing the relevant options, press the Save option.
- QuickBooks will not link their account, and you will have them in your particular client list.
- You can now check and make modifications to the books as well.
What If I Have To Add Clients Who Don’t Use QuickBooks?
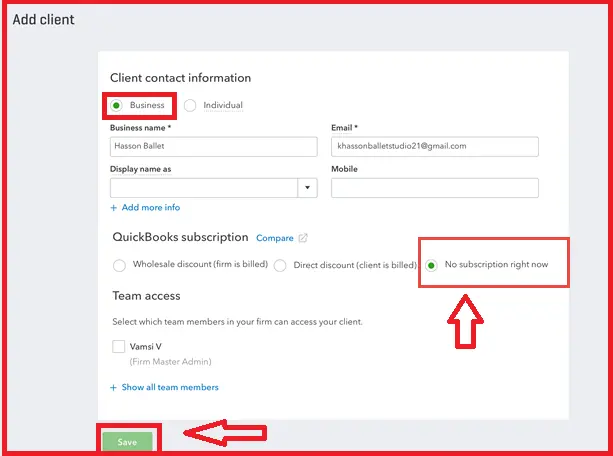
In case your client is not using the QuickBooks Online application at all, you still have the option to add them. You can add them to your firm and keep their information handy in one place. Now, see how to accomplish this task:
- When in your QuickBooks Online account, navigate to the Clients menu.
- Thereafter, you need to choose the Add Client option.
- Next, choose one among the Individual or Business.
- Moving further, add the details of the clients you want to add to the QuickBooks Online.
- Now, in the Products section, choose No Subscription.
- After accomplishing the above-stated steps, choose the Save option.
These steps can help you add clients who don’t use the QuickBooks application.
How to Delete A Client in QuickBooks Online?
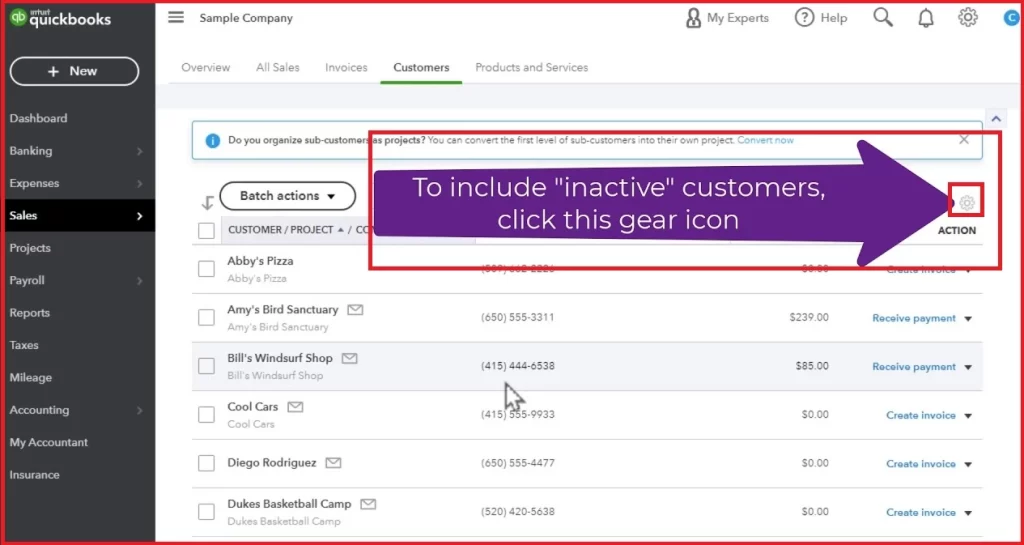
If you are not catering to a customer anymore, you might want to delete them from your records. However, it is not possible to delete a customer once they are used in a particular transaction. Deleting them will also delete that particular transaction and can bring forth a discrepancy in your financial records. But, if you still don’t want to do business with your client, you can simply inactive a customer in QuickBooks Online. Once inactivated, the customer won’t show anymore in the Customer Centre. However, they will show up in the related financial records.
Below is how you can inactivate a customer from the Customer Center:
- In the first place, you need to choose the Customer you want to delete.
- Next, press on the drop-down arrow located next to the Create Invoice.
- Here, you need to choose Make Inactive, and the customer will no longer appear in the Customer Centre.
Winding Up!
Adding clients in your program lets you manage clients in QuickBooks Online Accountant and also help in record-keeping. You can handle their bookkeeping tasks and also provide them with the best-discounted price on their accounting products. Once added, you can reap these amazing benefits of QuickBooks Online Accountant in handling your client’s books efficiently.
Frequently Asked Questions
ProAdvisor Preferred Pricing Plan comes with a monthly subscription to the new QuickBooks Online, QuickBooks Online Payroll, and QuickBooks Time. This plan helps Intuit-certified ProAdvisors to provide their clients with the best long-term pricing plan and set them up.
You can have duplicate clients in QuickBooks Online Accountant by mistake. However, you can’t simply delete one to keep your records accurate. But you can merge them to deal with this tricky situation by implementing the below-given steps:
- Log into your QuickBooks Online Accountant using the admin credentials.
- Next, select the Gear-shaped icon, followed by selecting the Merge duplicate clients option.
- Once done, hit Get Started.
- In the end, checkmark the box for each Target client you want to merge and keep in your Customer Centre.
To add and set up a new client in QuickBooks Online, you need the client’s name, shipping and billing address, email address, and contact information. You can also add their preferred payment methods along with the payment terms.
You can import your customer’s data in the QuickBooks Online application with a few simple steps. You can move your data using Excel, CSV, or Google Sheets files. You need to go to the Customer tab and hit the Import Customer option.
