Wondering how to set up your sales tax in QuickBooks Online? Well, here is an intuitive post that will explain all you need to know about the same.
Tax calculation and filing is a serious task and needs to be done with the utmost accuracy. Setting up sales tax in QuickBooks Online helps businesses automate the taxation processes. The program itself calculates your taxes based on the receipts and invoices. Thus, it facilitates an accurate tax filing without needing you to break a sweat.
Moreover, you can receive notifications when your taxes are due so that you can pay them on time and avoid late penalties. When all the important competencies of your business taxes are managed in one place, setting up sales tax in QBO can be a boon for your business. However, if you are not aware of the procedures involved, this post can be an effective help. Let’s start!
Sales Tax Calculation Rates in QuickBooks Online
The tax rates for calculating sales taxes in QuickBooks Online are based on several factors, which are:
1: Location Of Selling:
Different states can have different tax rates, and therefore, the tax rates can also differ based on your selling location.
2: Product You Are Selling
The product you are selling is also one of the crucial factors that define the tax rates for your business.
3: Whom You Are Selling
Lastly, whom you are selling also matters when it comes to the sales tax. For instance, if an NGO is your customer, they do not pay sales tax.
When tracking sales tax in QuickBooks Online, these are some crucial factors that determine the tax rates.
Procedure For Configuring Sales Tax in QuickBooks Online
If you want to configure the sales tax in QuickBooks Online, it is a very straightforward task. Below are the steps you can execute to accomplish the desired task:
Steps To Setup Automatic Sales Tax in QuickBooks Online
Run the below-stated steps with the utmost attention:
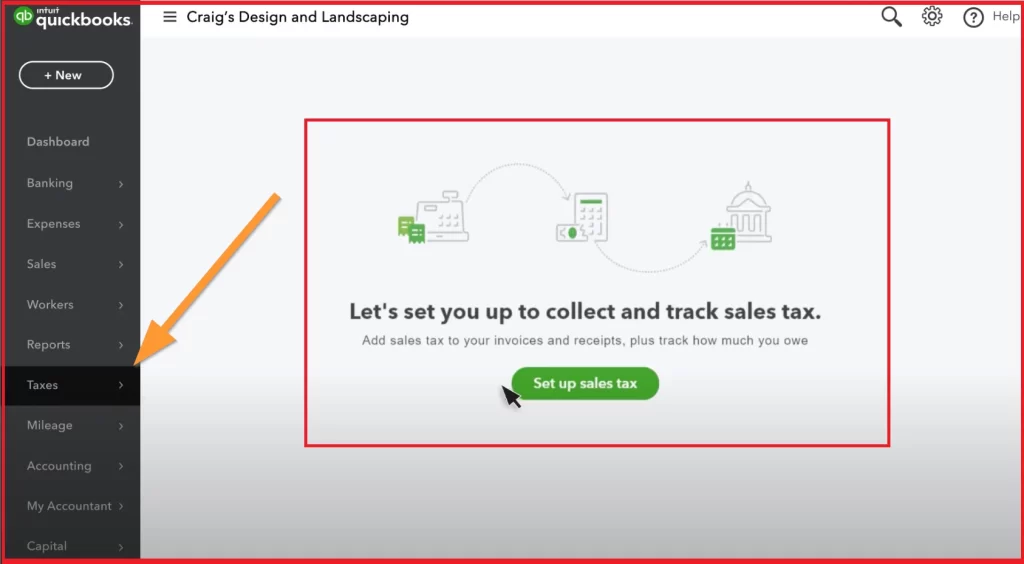
- When in your QuickBooks Online account, navigate to the left-side menu and click the Taxes option.
- Moving ahead, select Sales Tax.
- Thereafter, hit the Use Automatic Sales Tax button to advance in the procedure.
- Now, verify your business address and hit Next.
- After verifying the business address, check if you collect tax in other states as well and hit Next again.
- You can now close the tax setup window.
- In the end, you need to specify how frequently you need to file your taxes.
- Click Save to confirm the changes you have made.
Once you are done:
- After setting up your taxes, you can see your current due sales taxes on the Sales Tax page of the Sales Tax Center.
- You can change the sales tax agency using the Select an agency drop-down and pick one to view your sales tax data.
- Also, you can see the options, such as Sales Tax Settings and Economic Nexus, from the top right corner.
- Besides, you can locate the Reports drop-down list to run your tax reports.
- Moreover, the Tax Period Date drop-down list lets you select a date range for the list of the sales tax returns for the selected agency.
- If you want to filter the list by status, there is a Status drop-down for the same.
These are some important settings you can use for your Sales Tax management.
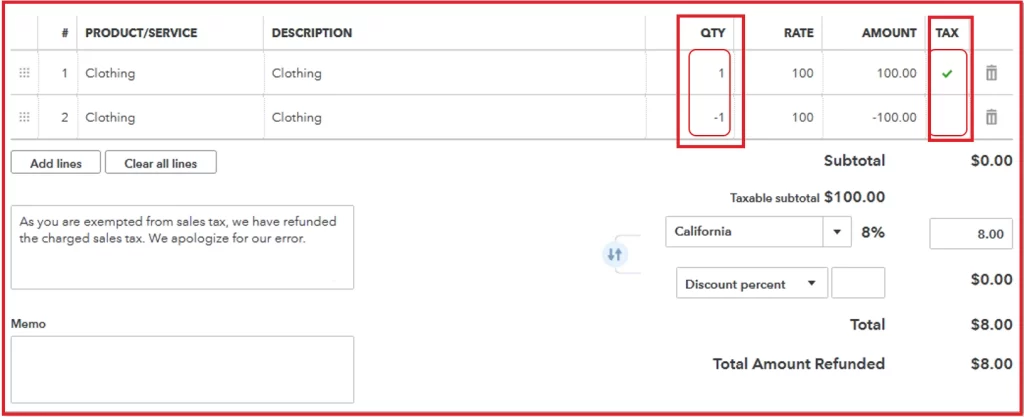
Method For Applying Sales Tax to an Invoice/Sales Receipt
QuickBooks Online allows you to add both taxable and non-taxable amounts to your invoices.
Now that you have enabled the automatic sales tax in QuickBooks Online, below is how you can apply sales tax to an invoice or sales receipt:
- First things first, you need to add products/services to your invoices or sales receipts.
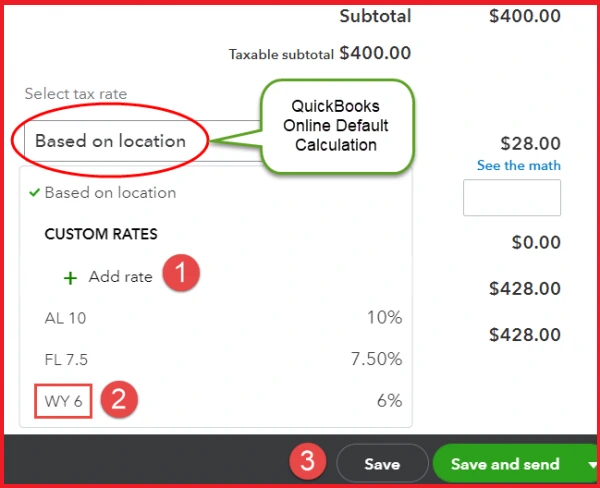
- Next, mark the checkbox located underneath the Tax column for any taxable product/service.
- Here, you need to make sure that the correct sales tax rate is selected from the Tax Rate drop-down list.
- You can choose the Based on location option, and it will automatically give you the correct tax rate.
How Can I Record Sales Tax Payments in QuickBooks Online?
It is crucial to pay your sales taxes when they are due to remain compliant and run your business smoothly. Besides, recording them in QuickBooks Online can help you gain useful insights into your business and sales processes. To record sales tax payments in QuickBooks Online, implement the below-explained steps:
- Once you are logged into your QuickBooks Online, click Taxes in the left-side menu.
- Now, select the Sales Tax option to jump to the next step.
- Thereafter, click the View Tax Return option you can locate to the right of a tax agency.
- Here, you can make some other adjustments as well if required.
- Now, hit the Record payment button to move ahead.
- Fill in the important fields with the relevant information.
- In the end, click the Record payment button to finish.
Once you set up your sales tax in QuickBooks Online, all these options can be used for better management of your business taxes. Besides, you can also adjust (increase and decrease) what you owe in sales tax.
What Are Different Sales Tax Reports in QuickBooks Online?
After discussing the procedure for Setting Up sales tax in QBO, let’s move ahead to reports in QuickBooks Online. Reports in QuickBooks Online give some specific information about your sales tax. Below is how you can access the sales tax report and what information you can derive from it:
- Go to the Taxes section and select Sales Tax from the left-side menu.
- On the top of the screen, you can locate the agencies you are tracking sales for.
- Underneath the agency names, you can locate the amount that you owe and the time period for the same.
- You can also use the Select an Agency drop-down list, and it shows various reports
- related to it, such as period, due date, amount, status, action, etc..
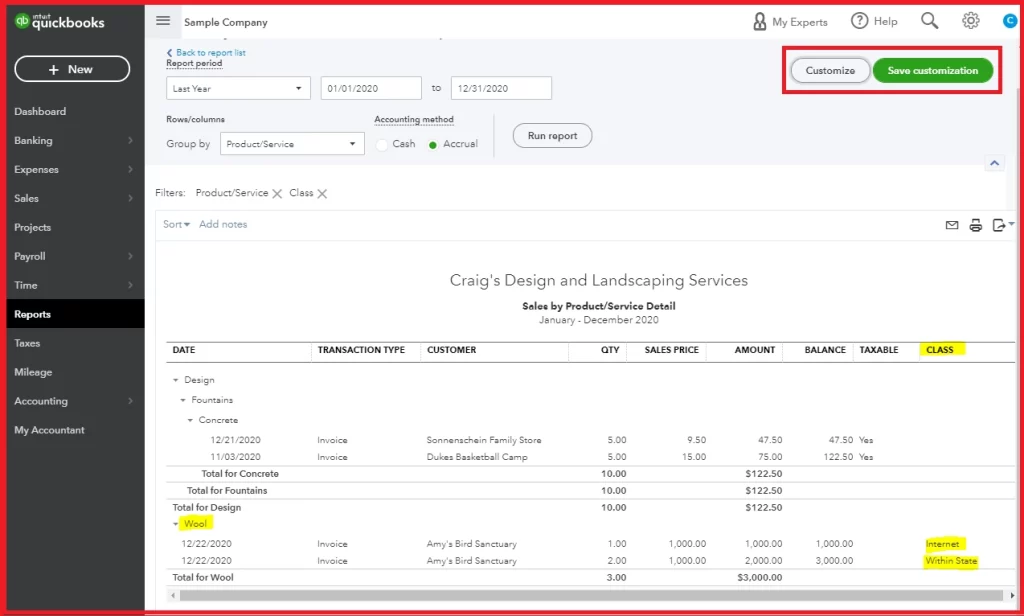
Tax Liability Report in QuickBooks Online
You can also check Tax Liability Report in QuickBooks Online from the Reports section. In this section, when you click the Reports tab, it turns green, and a sales tax liability report appears, offering an insight into your tax liability. When you click any number under the GROSS TOTAL, it will open a transaction report that has sales receipts and invoices used for calculating the overall taxes.
How To Make Payments For Sales Tax in QuickBooks Online?
Tax payment is a pivotal task for your business and helps you remain compliant with local and national regulatory laws. QuickBooks Online not only lets you set up sales tax and calculate taxes but also enables you to pay your taxes from within the program. To get it done, you need to track your sales tax accurately in the program. Below is how you can get the payment done:
1: Open Sales Tax From Within QuickBooks Online Interface
Log into your QuickBooks Online account in the first place and then go to the Sales Tax Centre located underneath the taxes tab.
2: Choose Sales Tax Option To Advance
After selecting Taxes, a new section will open, and you will see two different tabs – Sales Tax and Payroll Tax. Here, you need to click the Sales Tax, and it will turn green. In this section, you can see the list of the agencies you collect tax for based on what version of the QuickBooks application you are using.
3: Record Your Tax Liability Payment
In the next step, you need to record the tax liability payment by selecting the payment tab from under the agency you are paying the tax.
4: Record A Payment For The Return Period
In case you want to record a payment for the return period you are paying, go down to the Filings section and select your filing period. Once you are done, hit Record Payment to finish.
5: Record A Partial Payment (If You Are Making One)
If you are willing to make payments in instalments, you can record a new payment from within the Payments section. However, you should keep in mind that recording the payment doesn’t pay your taxes, but you need to file and pay it using a government website.
How To Prepare Sales Tax Return in QuickBooks Online?
If you are wondering how to prepare a sales tax return in QuickBooks Online, the below-given steps can guide you:
1: Prepare Your Sales Tax Return
- From the left menu, you need to select the Taxes option.
- Next, you need to make sure that the Sales Tax appears at the top and select it.
- You now need to locate the tax agency associated with the return besides the Sales Tax.
- When on the Return tab, select the Prepare Return option.
- Proceeding further, examine and confirm that the dates given in the Start Date and End Date fields are correct.
- Also, check the lines of the sales tax return with the balance owed/refund due.
Clicking the dollar amount lets you review the individual transactions. - If you want to adjust a line on the sales tax return, select Adjust option.
2: Submit Your Return Online
- In the next step, you need to submit your sales tax return online by paying a visit to the Department of Revenue’s website.
- You can complete the return using the information given by the QuickBooks Online application.
- Also, you can schedule the payment for the due date and return it to the accounting application.
- In the end, click the Record Tax Payment option after clicking the tax balance to be paid.
3: Close Sales Tax Period in QBO
- First things first, go to the Prepare Sales Tax Return page and select Mark as filed.
- After that, hit the Continue button and jump to the next step.
- QuickBooks Online will now create a bill for the tax you owe to the concerned agency.
Note: QuickBooks creates this bill as payable under the Chart of Accounts, and it does not appear in the Enter Bills window.
4: Record Payment in QuickBooks Online
- Click-open the Filed from the All returns drop-down list to start.
- Here, you need to select Record payment from the list in the Action column.
- Now, select a suitable Payment type and also enter the date for the payment.
- After making the payment, you can see it in your Account History.
Taking Everything Into Consideration!
This post explains the procedures for setting up and tracking Sales Tax in the QuickBooks Online application. The accurate tracking and payment of your sales taxes can make it easy for you when it’s tax time. However, if you are having any technical unease, you can reach out to the experts and get the desired help.
Frequently Asked Questions
A sales tax is paid to the concerned governing body for the sales of products or services. The regulatory laws give the permissions to collect the funds for the tax from the consumers while purchasing the products or services. The sales tax may vary on different parameters, such as what you are selling, where you are selling, and whom you are selling.
Once you set up the automated sales tax in QuickBooks Online, it gives you a detailed look at the taxes you owe. Besides, you can also get to learn why you owe these taxes. It can be very helpful in filing your taxes.
QuickBooks Online account for sales tax feature lets you track due dates for your tax payments so that you pay on time and keep tax penalties at bay. At the time of the filing, you can check and confirm that everything is correct. Thereafter, you can e-file to your tax agencies on their websites. Alternatively, you can also send your return by email.
Once you set up your sales tax in QuickBooks Online, the program lets you manage the tax rates being applied to product categories in your invoice. You can also set up rules for different states, as the tax rates may vary from one location to another. After categorizing the products, QuickBooks will make sure that the applied tax rates are correct.