Learn how to change or downgrade your QuickBooks Online Subscription plan. We’re here to help you manage your subscription plan as per your business requirements.
Are you looking to cancel or downgrade your QuickBooks online but don’t know what to do? If yes, here’s the complete guide for you. Multiple factors are answerable for canceling the QuickBooks online subscription about which we will discuss later. Well, there are several considerations that you need to focus on before canceling or downgrading the online subscription. So, continue reading this post till the end.
Call at 1-833-210-4702 and immediately get assisted with QuickBooks professionals for more help. Our team will guide you everything related to downgrading the online QuickBooks subscription.

Reasons for Cancel or Downgrade Your QuickBooks Online Subscription
A variety of situations may make you downgrade QuickBooks your QuickBooks online subscription. Below we have listed some of the commonest ones. Have a look:
- Perhaps, you may be deciding to save money by replacing your current plan to the one costing you less.
- You must change or downgrade the current QuickBooks online if it’s not meeting your business requirements. Switch to another one that suits your business operations.
- If you’re looking to access the enhanced and improvised features of any new QuickBooks edition, you must cancel your QuickBooks Online subscription of the current version and subscribe to the latest edition.
Well, whatever the situations or reasons for canceling the online QuickBooks subscription plan, it’s essential to learn the basics for downgrading the subscription. So, let’s quickly understand the procedure for the same.
Reminders Before you Cancel your QuickBooks Online Subscription
If you’re searching for can you downgrade QuickBooks online or cancel the subscription, yes, you can. But, before that, you must consider the tips and reminders given below.
Download your QuickBooks Online Data
Before you decide to cancel or downgrade your current QuickBooks online subscription plan, we strictly suggest you download all your QuickBooks online application data and save it on your computer. It will be a backup of all your crucial financial records. So, follow the steps below to create this backup:
- Firstly, sign in to your QuickBooks account and directly move to the Gear icon.
- Here, go to the Tools section and select the Export Data option.
- Now, you must choose the date range for the data you need to download.
- Once decided, now, finally, click the Download option.
Any Outstanding Charges? Check it out!
Sometimes, the unpaid fees or due payments may bring outstanding charges to the QuickBooks users. Thus, before you cancel your QuickBooks online subscription, review your account and check for such charges (if any). You must settle them first, and then proceed to canceling the subscription.
- Begin this procedure by first logging in to your QuickBooks online account, and move to the Billing & Subscription page.
- From here, you must check all your latest transactions. If you find any outstanding charges, settle them by clicking the Pay Now button.
Review your QuickBooks Online Subscription
It’s essential to review the plan that you’re deciding to cancel. For this, you must:
- Log in to your QuickBooks online application, and navigate to the Billing and Subscription page.
- In the next step, review your subscription details, including subscription plan, payment information, and renewal date.
- Finally, thoroughly review the cancellation policy and ensure the required details are correct.
Cancel Auto Renewal (If enabled)
If you have set automatic renewal in your QuickBooks online account settings, turn it off. For this:
- Firstly, you must sign in to your QuickBooks online application.
- Now, navigate to the Billing and Subscription Settings in QuickBooks Online.
- Here, search for the subscription plan you wish to cancel or downgrade. Once you find it, click the Edit link, and scroll down to the Renewal and Payment section.
- Now, choose the Turn off alternative in the Automatic Renewal Dialog box.
- Lastly, review the cancellation details and choose the Confirm option to successfully end the procedure.
Quick Steps to Downgrade your QuickBooks Online Subscription
Below is the simple and quick procedure to downgrade your QuickBooks online subscription. Remember that a few specific features of your current QuickBooks online version won’t be deactivated before they get reduced. Now, come to the downgrade subscription process:
- Firstly, you must open your QuickBooks online application that you’re currently using.
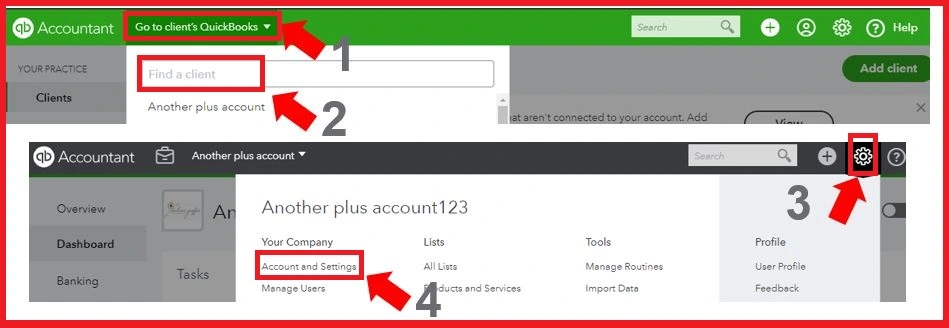
- Now, in the QuickBooks Online Accountant tab, move to the Settings option.
- From here, choose and hit the Subscription and billing option.
- After this, you must select an Account subscription alternative.
- Done till this? Now, select the arrow which is next to the client’s name. Once you click it, you will see the subscription details of your client.
- Finally, move to the Subscription Actions menu, and hit the Downgrade button.
By following all the instructions above, you can easily downgrade your QuickBooks online subscription.

What to do to Cancel Your QuickBooks Online Subscription?
To cancel your online subscription, you must follow the steps below. Carefully carry out the simple instructions given below:
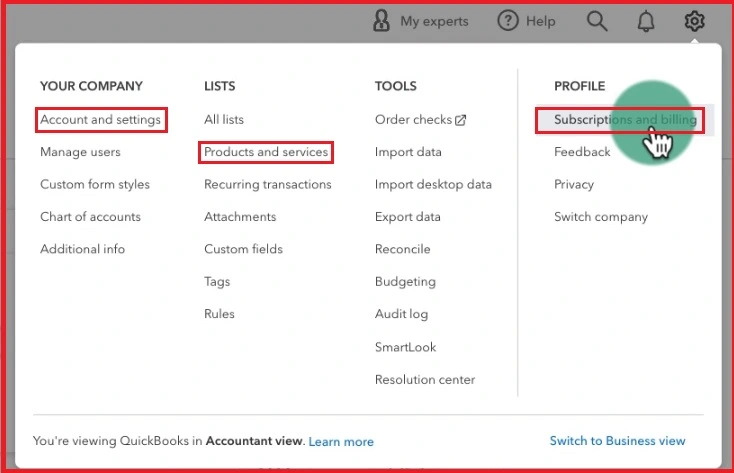
- Initially, open your QuickBooks online application, and move to the Gear icon.
- In the next step, choose the Account and Settings option. Following this, directly move to the Billing and Subscription tab.
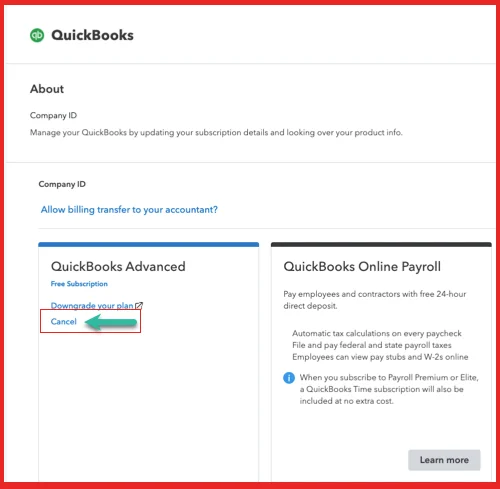
- After this, a few QuickBooks sections will appear on your screen. From here, click the Cancel Subscription button.
- Done? Now, select the Continue to cancel option, and follow the on-screen instructions.
- Continue to cancel again, and click the Submit option to cancel your subscription.
- Finally, hit the Got it button, and you’re done. You’ve successfully canceled your QuickBooks online subscription.
How Can Users Upgrade a Client’s Subscription Level?
Users may wish to upgrade a client’s subscription level in QuickBooks online to access more and improved accounting capabilities of the application. And by upgrading the QuickBooks membership level, users can easily do that. If you’re also looking for leveling up your QuickBooks membership, follow the steps below:
- Initiate this procedure by first launching your current QuickBooks online application version.
- Continue moving to the Settings alternative, and go to the Billing and Subscription Settings in QuickBooks Online.
- Now, in the QuickBooks online accountant section, choose the Accountant-billed subscription button.
- In the next step, search for the client and then and there, hit the arrow besides the client’s name.
- By this, you can view all the information/data related to the client’s subscription.
- Finally, choose the Subscription actions dropdown menu, and from here, select the Upgrade alternative.
And you’re done! By this, you will successfully upgrade a client’s subscription level in QuickBooks online.

Problems When Upgrade or Downgrade your QuickBooks Online
Below we have listed all the methods to fix the issues that may arrive when you upgrade or downgrade your QuickBooks Online.
Recurring Transactions/Templates
If an issue occurs while downgrading or upgrading your QuickBooks online application, you must turn off templates or carry out the instructions below:
- Open your QuickBooks application and move to the Gear icon.
- Choose the Recurring Transactions option, and click the Pause button from the appearing drop-down menu.
- Finally, end the entire procedure for all the recurring transactions and templates.
Remove Users
In this case, you must choose the Remove option for each user. Also, you can manually carry out this procedure by:
- First, navigate to the Gear button in QuickBooks online application.
- Now, click the Manage Users option, and highlight the user’s name you wish to remove.
- After this, choose the Delete button, and by this you will be asked as Are you sure you want to delete?
- So, select the Yes alternative to simply remove the user. Now, depending on the user’s limit in the new subscription plan, you can repeat this procedure.
How to Deactivate or Reactivate a Product or Service?
Whenever you upgrade or downgrade your QuickBooks online subscription plan, you need to reactivate or deactivate a QuickBooks product or service. In this section, we have explained both the procedures. Have a look:
Reactivating a QuickBooks Product or Service
- Initiate the procedure by first moving to the Gear icon of the QuickBooks online application.
- Now, hit the Products and Services list. After this, select the Inactive or All option from the Filter drop-down list.
- Click the Apply option and continue to highlight the inactive product or service row.
- After this, choose the Make Active alternative for the product or service of QuickBooks you wish to reactivate.
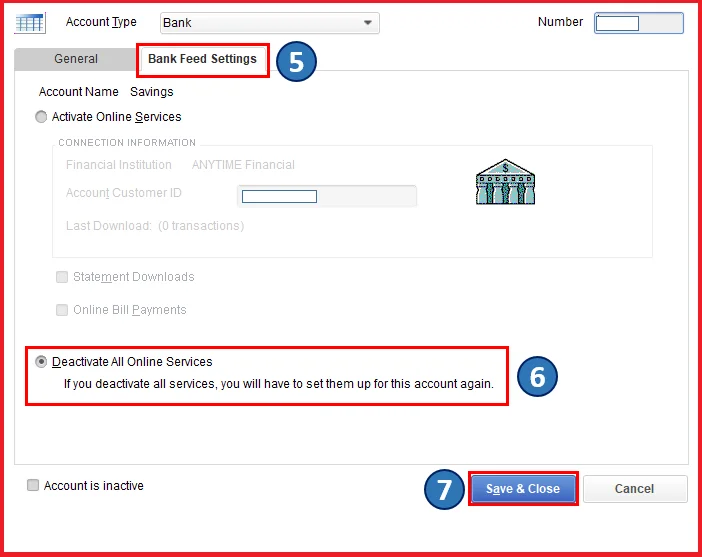
Deactivating a QuickBooks Service or Product
- Remember that when you downgrade your QuickBooks online subscription, the inventory quantity will be removed.
- Now, begin the deactivating a QuickBooks product or service by first moving to the Gear option.
- After this, select the Product or Service of the QuickBooks online that you wish to deactivate.
- Here, you can see an arrow beside the product or service of the QuickBooks online application.
- So, click this arrow, and select the Inactive option.
- Lastly, hit the Yes option to confirm the QuickBooks service or product deactivation.
Can you Cancel or Downgrade your QuickBooks Online for Payroll?
Yes, if you’re processing payroll in QuickBooks online and don’t want to continue with the same QuickBooks version, you can cancel or downgrade your QuickBooks online subscription for payroll. Here’re the penned-down steps for the same:
#1 Step – Finish your QuickBooks Online Payroll Subscription Plan
- Firstly, you must finish your QuickBooks online payroll subscription plan, and complete the final payroll.
- Once done, continue printing these payroll reports.
- Here, you must make sure that you have cleared the outstanding tax deposits (if any).
- Also, you need to execute and file the outstanding Annual or Quarterly Forms. Now, move to the next step.
#2 Step – Invalidate your QuickBooks Online Payroll Service
- Begin this procedure by first moving to the Settings option and clicking the Account and Settings alternative.
- After this, move to the appeared payroll section, and hit the option for Billing and Subscription Settings in QuickBooks Online.
- Following this, hit the Cancel button, and fill the QuickBooks online payroll cancellation form to cancel your QuickBooks Online subscription.
Cancel or Change Subscription in QuickBooks Online for Payments: How?
With the steps given below, you can easily cancel or change subscription in QuickBooks online for payments. For this:
- Firstly, you must cancel your payment account in QuickBooks online. For this, log in to the Merchant Service Center using your admin user account.
- In the next step, select the Account tab and hit the Account Profile option.
Now, you must hit the Close Account alternative, and make sure to use your admin user credentials. - From the drop-down menu, you must choose a reason for closing or changing your QuickBooks online subscription.
- After this, you must write any comment in support of the selected reason. Finally, press the Submit button, and it’s done.
For Further Details, Connect with Us..!
If you’ve decided to cancel, change, upgrade or downgrade your QuickBooks online subscription, it won’t be a hassle or tough enough if you consider the instructions given above. We hope this guide has helped you cancel or change the subscription and much more. However, we understand it’s a technical procedure and you may face issues while downgrading or changing the subscription plan. If such a case happens with you, just connect with our support team via Live Chat Support. Our experts are available to immediately serve the users.
Frequently Asked Questions
Ans: Below are the simple steps to remove or delete a specific company from the QuickBooks application:
- Open your QuickBooks application and move to the File menu.
- In the next step, choose the Close company option.
- Once chosen, now you must select the Edit list tab, and add a tick-mark to the company file’s box that you wish to delete or remove from QuickBooks.
- Finally, hit the OK option to end the entire procedure.
Ans: Sure! Just follow the method below as per the given instructions and cancel the Intuit’s online QuickBooks payroll subscription plan:
- Open your QuickBooks online account, and click the Settings option.
- Now, choose the Account and Settings button.
- In the next step, you must click the Billing and Subscription Settings in QuickBooks Online.
- Here, hit the cancel post from the appeared payroll section on your screen.
- Lastly, choose the Continue button, and finish the survey to confirm the cancellation of your Intuit’s online payroll subscription plan.
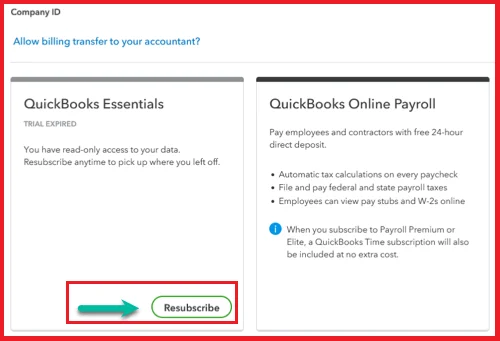
Ans: Yes, by carrying out the steps below, you can easily reactivate the specific QuickBooks payroll service in the QuickBooks online account:
- Firstly, you must launch your current rendition of QuickBooks online application.
- After this, go to the Settings tab, and choose the Reactivate the account button.
- Now, you must perform as per the on-screen instructions, and confirm the reactivation of the particular payroll service in the QuickBooks online account.
Ans: Below mentioned are some of the most crucial points to consider before you cancel or downgrade the QuickBooks online subscription plan:
- You can’t cancel the QuickBooks without being signed into your QuickBooks account as an administrator.
- Only the person who legally owns the account can cancel the QuickBooks account.
- In case you are not in the United States, you can still cancel your QuickBooks account with the help of canceling the online subscription under the ‘Non-US’ section.
- All the e-payments and other deposits must be completed and cleared off before you cancel the QuickBooks.
- In case of a suspended account, a re-subscription is mandatory before you become eligible to cancel your QuickBooks account.
Ans: Pay attention to the below points to learn what happens to the 3rd party services after QuickBooks subscription cancellation:
- Definitely, the 3rd party feature or app integrated with QuickBooks online won’t be synced into QuickBooks online after the cancellation of subscription plan. Thus, users need to attempt manual data entry to update operations in QuickBooks online.
- You must remove the stoppers or issues occur while downgrading or canceling the subscription plan. Once you do this, you will be able to continue through the Change my plan confirmation page. This will include a summary of your new plan billing details and a chance to update the payment method.
- After you view the new billing amount and existing credit card information, select Confirm to complete the process.
- A summary screen appears reiterating the plan change and the next billing date. Select Sign out. For changes to take effect, you must log out of QuickBooks Online.
- Now re-login QuickBooks and verify that the changes ratiocinate in your account settings (Gear > Account & Settings > Billing and Subscription).