Disclaimer – Here in this post, we will guide you on how to create bank rules in QuickBooks online. Now, easily manage and automatically categorize your business transactions.
Yes, it’s possible to create and manage bank rules in QuickBooks online. Intuit allows users to create bank rules in their QuickBooks online application manually. QuickBooks bank rules help businesses customize their banking transactions in QuickBooks online. Additionally, you don’t have to invest your long hours filtering regular recurring transactions. The bank rules in QuickBooks online automatically categorize such transactions. So, are you excited to learn how to create these bank rule in QuickBooks online? If yes, continue reading this post till the end.
QuickBooks Online helps users categorize their business transactions. Contact our professional team at 1-833-210-4702 for further details and help regarding QuickBooks online banking rules.
Explaining How to Use Bank Rules in QuickBooks Online
Are you searching for how to use bank rules in QuickBooks online? If yes, firstly, create the bank rules with the instructions given below:
Simple Steps For Creating Bank Rules in QBO
As discussed above, the bank rules feature in QuickBooks online helps you save time and reduce transaction categorization errors. Thus, creating bank rules in QBO becomes essential if you’re doing business with the same clients, donors, vendors, or customers. Here’s the simple procedure for the same:
- Firstly, you must open your QuickBooks online application and move to the left menu to choose the rules option from the banking menu.
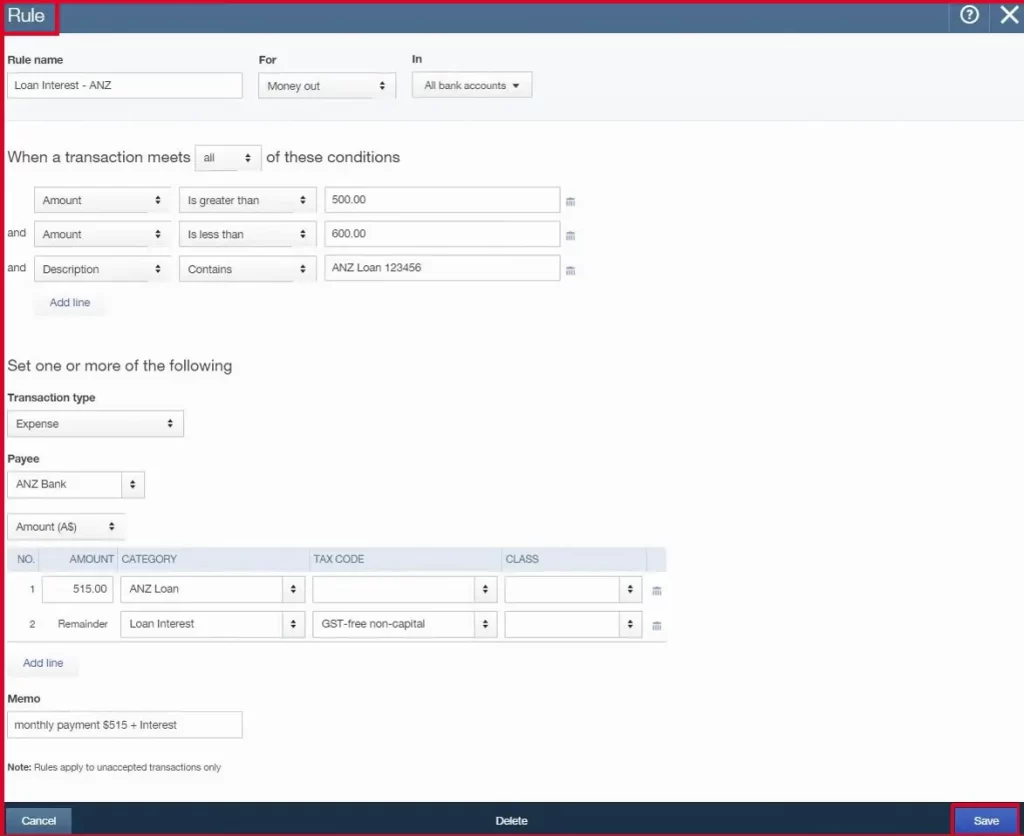
- In the next step, you must choose a new rule and open the rule window. Now, continue adding a name to the rule name file.
- Following this, choose the Money in or Money out option from the appearing dropdown menu.
- Continue to this and choose the credit card or bank account alternative. Now, here, you must set the bank rule conditions.
- Here, you need to decide if you want your transactions to get customized when they meet any outlined terms and conditions. If yes, continue to create rules.
- After this, you must confirm whether the bank rule applies to your bank description, amount, or text provided in the conditions field.
- Once confirmed, now select the required settings for the bank rule and determine the transaction type, payee, and the category to apply.
- Finally, you must choose the trash bin icon to remove a condition and conclude the procedure by hitting the Save button. By this, you will learn how to make bank rules in QuickBooks online.
Once you’ve created the bank rules using the above steps, use them to categorize your business transactions. Use the rules at the time of paying off customer billing, reports, and taxes as well.
It’s essential to learn how to use bank rules in QuickBooks online. It’s because:
- Using bank rules helps you control how your incoming bank transactions are categorized before accepting them into your QuickBooks application.
- Also, as explained above, you can save enough time, manual effort, and even typing mistakes.
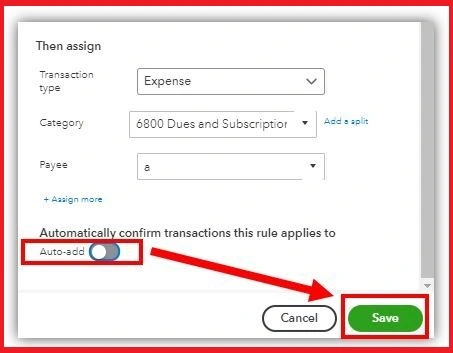
What’s the Automatic Creating Bank Rules in QBO?
Talking about creating bank rules in QBO automatically, basically, the targeted bank rules get created, and certain transactions are accepted automatically into the My Books option from the Banking Page of the QuickBooks Online application. To execute this, follow the instructions below:
- Firstly, if you want to turn on this automatic My Books option, move to the Rules window, select the Automatic Add to My Books option, and hit the Save option.
- In the next step after creating the Auto-add rule, you need to ensure that any transaction made from your end is automatically added to the For Review tab.
- Now, to run these add-one rules, firstly log in > create or modify a new auto-add rule > upload file.
How to Edit Bank Rules in QuickBooks Online?
Once you’ve created, you need to undertake the steps below to learn how to edit bank rules in QuickBooks online. By editing these rules, you can manage the transaction categorization as per your customer’s/vendors’ payments.
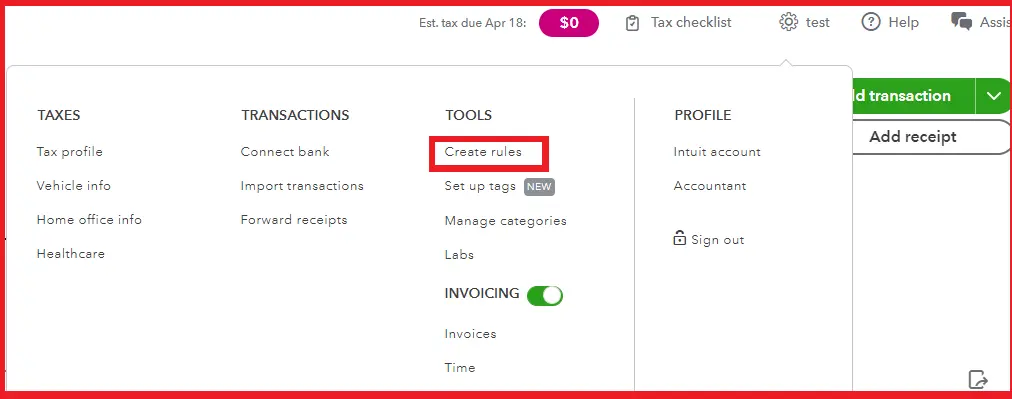
- Firstly, open your QuickBooks online application, and from the left-side dropdown menu, choose the Transactions tab.
- Here, you will find multiple options to choose from, including Banking, App transactions, Rules, Tags, and Receipts. So, select the Rules alternative.
- Now, you can see multiple rules. With each rule, you will find the Edit option. So, click the same and start changing the rule’s settings.
- Once you’ve edited the rules as per your requirements, hit the Save option, and it’s done.
We suggest you carefully execute the procedure above and learn how to edit bank rules in QuickBooks online. Now, let’s continue and take a look at the process of importing and exporting bank rules. But before that, you need to pay attention to certain crucial factors.

Things to Consider Before Importing & Exporting Bank Rules in QBO
Carefully look at and make sure to consider the following important points before begin importing and exporting bank rules into QuickBooks online:
- You can only upload transaction data into QuickBooks online using Excel or a CSV file. It allows you to automatically import transactions by saving you enough time.
- We strongly recommend you back up your existing QuickBooks data before beginning the import process. The backup file will ensure the safety of your financial records from potential or unexpected threats and issues.
- Before importing the bank rules in QuickBooks online, you must review and verify the bank transaction data to ensure correctness. You are required to thoroughly cross-check the transaction categories, dates, descriptions, amounts, and payee details as well.
- In case you find any error or typing mistake in the transaction details or amounts, make sure to edit and correct the same before importing the bank rules.
- The next important point you need to keep in mind is to align all the columns in your data file. Ensure the proper alignment and that every field of the file matches the respective fields.
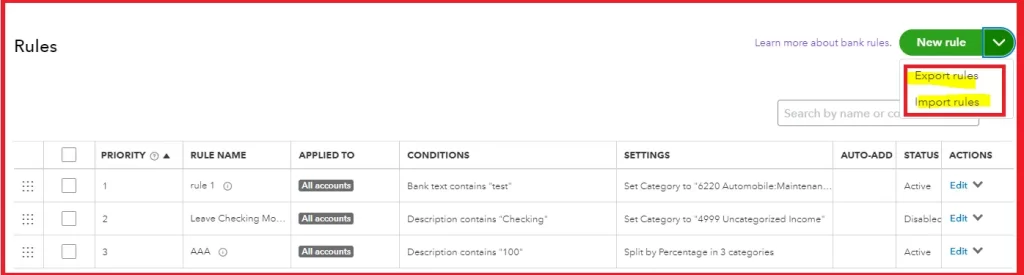
Importing and Exporting Bank Rules Into QuickBooks Online
If you’re looking to save enough time and minimize manual efforts while categorizing transactions, importing and exporting bank rule into QuickBooks online is the solution. Simply import, export, and connect your business with bank accounts, ensuring error-free and accurate financial records.
The procedure is simple, as mentioned below. Carefully follow the instructions:
- Firstly, you must create the bank rules per the abovementioned steps.
- Secondly, hit the dropdown arrow to the New Rule button from the right side of the Rules page.
- After this, hit the Export rules option. By this, you will see some on-screen instructions to begin the export process.
- The exporting of bank rules will be done in MS Excel file. Here, the file name will appear as named [company] Bank_Feed_Rules.xls.
- Now comes the importing process into another company of QuickBooks online. For this, you must open your QuickBooks company to update.
- You must choose the Manage Rules option and move to the left bar. Here, select the Transactions button, and then hit Banking.
- After this, click the dropdown arrow from the upper-right corner to the right of the Update option. Following this, select the Manage Rules option.
- Again, move to the upper-right corner and take the dropdown arrow to the right of the New Rule option. Done? Now, you must choose the Import Rules option.
- In the next step, you’re required to choose the Excel file where all the exported bank rules are saved.
- Hit the Next option, and choose the Rules you wish to import. Finally, click the Next button.
- Now, here, you need to make sure that the importing and exporting of bank rules into QuickBooks online for another company have the right payees and correct categories set up.
- If it’s not, you can specify the same before finalizing the import process.
- Finally, click the Import option and hit the Finish option to end the procedure successfully.
Perks to Avail from QuickBooks Online While Importing Bank Rules
QuickBooks Online is unquestionably an impressive and complete suit for managing all the business financial operations. If we talk about the software while integrating bank statements and importing bank rules, you can leverage the following perks:
- When you set up bank rules in QuickBooks online and begin importing them in QuickBooks, you get streamlined financial management with valuable insights.
- The next benefit is related to Data Accuracy. The online application ensures complete data accuracy by importing bank transactions directly and exactly from your financial records.
- Also, integrating bank statements with QuickBooks minimizes the risk of manual data entry mistakes and data errors.
- By importing bank rules in QuickBooks, you can access your financial data remotely as well. What all it demands is a stable and strong internet connection.
- Enough flexibility to smoothly access your financial records from multiple locations is another benefit for all business accountants like you.
- The QuickBooks online application automates and simplifies your bank reconciliation process as well. Additionally, it helps you easily detect data discrepancies (if any) and reconcile your bank accounts more easily.
- Importing and exporting bank rules into QuickBooks online also minimizes the risk of data damage.
Here’s How to Quickly Set Up Bank Rules in QuickBooks Online
The added feature Bank Rules in QuickBooks online has simplified the entire way of categorizing bank transactions. The automatic categorization allows users to customize their bank feeds and easily accept transactions in QuickBooks online. Let’s have a quick look at the steps below and set up bank rules in QuickBooks Online to leverage all such facilities.
- You must begin this procedure by first opening your QuickBooks online application.
- Now, move to the left-side menu, and from here, click the Transactions tab.
- After this, from the appeared section, select the Banking option.
- Following this, right-click the dropdown arrow on File Upload and hit the Manage Rules option.
- Here, you must click the New Rule button. Once you click it, the Rules Page window will appear on your screen.
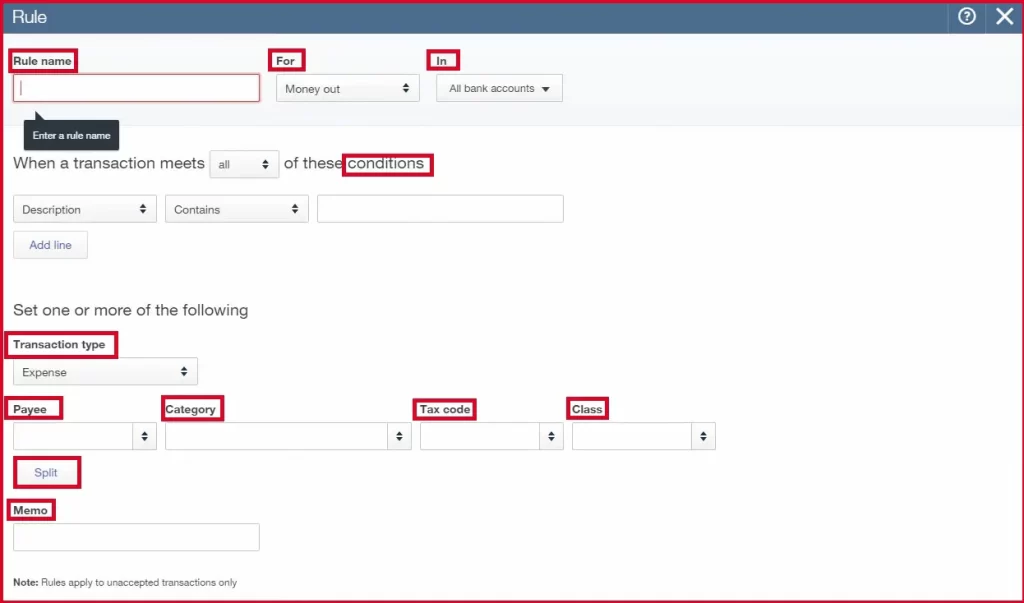
Fields of the Bank Rules Page
On the bank rules page, you will see the following fields:
Rule Name
You must enter the name of the bank rule that will display when an automatic transaction is filled out for you. The rule name helps you remember and know exactly what bank rule has been applied.
For
In this field, you must select anyone between the Money Out (expenses) and Money In (income) options.
In
Here, you will be asked to select the bank account or credit card account to use the bank rule for. Also, you can apply rules to any bank account or all bank accounts.
Conditions
You need to make sure that all or any conditions are met.
Description
In this field, you will see all the descriptions for your transactions. The description reads, “Contains – Is Exactly – Doesn’t Contain.”
Amount
From this field, you can choose the dollar amount of the transaction. The field will be shown as “Equals – Is greater than – Is less than – Doesn’t equal.”
Bank Text
You are recommended to simply cut and paste the bank text from the bank feeds area. When you set up bank rules in QuickBooks online, use the “Contains” condition for the transaction.
Transaction Type
From the given options, you must choose the transaction type. Have a look:
- You can select Money Out from Expense – Cheque – Transfer.
- Money In – you can select this option from Deposit / Credit card credit – Transfer.
Payee
This field is for the Customers or Suppliers. It also depends on the Money Out and Money In alternatives.
Category
This is the expense or income account type that you will use for transactions.
Tax Code
The applicable GST code must be entered here during each transaction time.
Class
In this field, you need to choose the class category (if applicable).
Location
Put the location here (if applicable); it’s the location tracking category filed.
Memo
It’s a detailed transaction memo field.
Split
With this field, you get help while allocating specific transactions across tracking departments and bank accounts. The Split button here will help you split the bank transaction based on deciding percentages to different categories or fixed transaction amounts. Also, you can edit this section by clicking the dropdown arrow.
Frequently Asked Questions
QuickBooks bank rules basically automate the categorization of downloaded transactions from your bank. These rules save you valuable time in reviewing the entire process by speeding up the categorization. You can even prioritize and customize these bank rules as per your business demands.
Yes, you can. Prioritizing the bank rules in QuickBooks online is a must and easy as well. For this, find the bank rules list you have created in QuickBooks under Banking and Rules. After this, move your most preferred and crucial rule to the top and continue the same as per your priority. Remember, in QuickBooks online; you can make a rule per transaction.
Yes, there is an available Split feature that you can see on the Rules Page. When you turn on this Split button, you can easily assign specific bank transactions across all the tracking departments and multiple bank accounts. Also, you can split transactions automatically in QuickBooks online based on the assigned percentages to different transaction categories and their fixed amounts.
Up to 5 conditions per rule, QuickBooks Online supports bank rules migration.
When categorizing downloaded transactions from the bank, bank rules come into play. You must create and use them to automatically categorize and navigate transactions to the right accounts. By using the Bank rules, you can minimize the manual efforts for data entry and save long hours as well.