Are you looking to go beyond the conventional accounts-tracking in QuickBooks? We got you. Switch to QuickBooks class tracking and change your way of tracking specific expenses, sorting shared expenses, and handling one-off accounting expenses. With class tracking in QuickBooks, you get better expense control, quick tracking, and easy expense tracking.
So, are you excited to learn how to set up this impressive class tracking in your QuickBooks application? If yes, this blog will help you. Continue reading till the end.
Dial 1-833-210-4702 and get quick, professional assistance from our certified QuickBooks support team. Have a one-on-one conversation with us and learn about class tracking in QuickBooks.
QuickBooks Class Tracking – A Brief Introduction!
As mentioned above, QuickBooks class tracking basically allows accountants to track their account balances across multiple departments. QuickBooks makes it easier for users to create classes and assign them to separate transactions. It eventually helps them track their expenses and balances through multiple business offices, separate properties, and other departments of the business.
Class tracking mainly contributes to the businesses in the long run by tracking and recording expenses for each business department. With the customized way of tracking your specific expenses through class tracking, you can better manage your business’s daily expenses and continue with a seamless cash flow.
Class Tracking in QuickBooks – What Does it Include?
Class tracking in QuickBooks helps you categorize expenses based on specific accounts. Also, you can manage occasional spending, customize your individual business expenses tracked in QuickBooks, and manage accounting for exceptional situations. Additionally, QuickBooks class tracking helps you group specific transactions with the help of its user-friendly class tracking tool. Eventually, it will not only help you in expense tracking and categorization but also give you the required insights and data for your company’s growth.
Let’s discuss how to set up and use class tracking in QuickBooks. However, the procedure is different for Online and Desktop users.
How to Set up and Use Class Tracking in QuickBooks Desktop?
Here’s the quick procedure to set up and use class tracking in QuickBooks Desktop. Perform the enlisted instructions carefully and start enjoying the perks for your business in the long run. We have instructed specifically for both Windows and Mac QuickBooks users.
Reminders Before Turning On Class Tracking
- Make sure to create classes on the reporting style you want to use. Also, consider how you wish to show your business segments on the expense reports.
- Do not forget to create a separate class and name it “others.” It’s for the transactions that are unrelated or uncategorized.
Class Tracking in QuickBooks Desktop for Windows Users
- Firstly, you must open your QuickBooks Desktop Company File. Make sure you’re running QuickBooks as an administrator.
- Now, the next step is to navigate straight to the Edit Menu.
- From the drop-down Edit menu, you’re required to hit the Preferences option.
- In the next step, you must choose the Accounting option.
- After this, move to the Company Preferences page.
- Done till this? Now, continue selecting the utilize Class Tracking From the Transactions alternative.
- Here, we suggest you tick-mark the Assign Classes checkbox if you wish to add a Reminder.
- Finally, click the OK option and choose to exit from the current window.
QuickBooks Desktop Class Tracking for Mac Users
- Firstly, you must log in as an administrator and open your QuickBooks Desktop Software.
- Now, directly go to the QuickBooks Menu and continue choosing the Settings option from the drop-down Menu.
- After this, click the Transactions option from the Workflow section.
- Done? Now, tick-mark the use Class Tracking checkbox.
- Finally, close and exit from the Preferences Page and save all the changes done above.
How do I Add Class Tracking in QuickBooks Online?
Are you looking for how do I add class tracking in QuickBooks online? Well, your search ends here! Take a look at the penned-down procedure and set up class tracking in your QuickBooks online application:
- Firstly, open your QuickBooks Online application and directly move to the Edit menu.
- In the next option, you will get a list of options. From this drop-down Menu, choose the Preferences section.
- After this, hit the link to Accounting and continue choosing the Preferences option for your Company.
- Now, click the use of Class tracking option, and continue hitting the OK button.
- Here, you must navigate to the Menu and select the lists as per your Preferences.
- Done with the above steps? After this, you must create the Categories specifically for your Spending.
- Right after this, choose the Class List option and start building a New Class by choosing the New option.
- Now, create a specific class for the Desired Expenses.
- Finally, end this whole process by entering the Class Name.
How do I Run a Class Report in QuickBooks?
Searching for how do I run a class report in QuickBooks? Carefully follow the given procedure below and learn how to run a class report in QuickBooks:
- Begin this procedure by first opening your QuickBooks software.
- Now, from the open window of QuickBooks, move to the Reports option and click the same.
- In the next step, hit the Company and Financial tab. From here, you must choose the Profit & Loss by Class report tab.
- Here, you will see a green arrow; click the same to run the report.
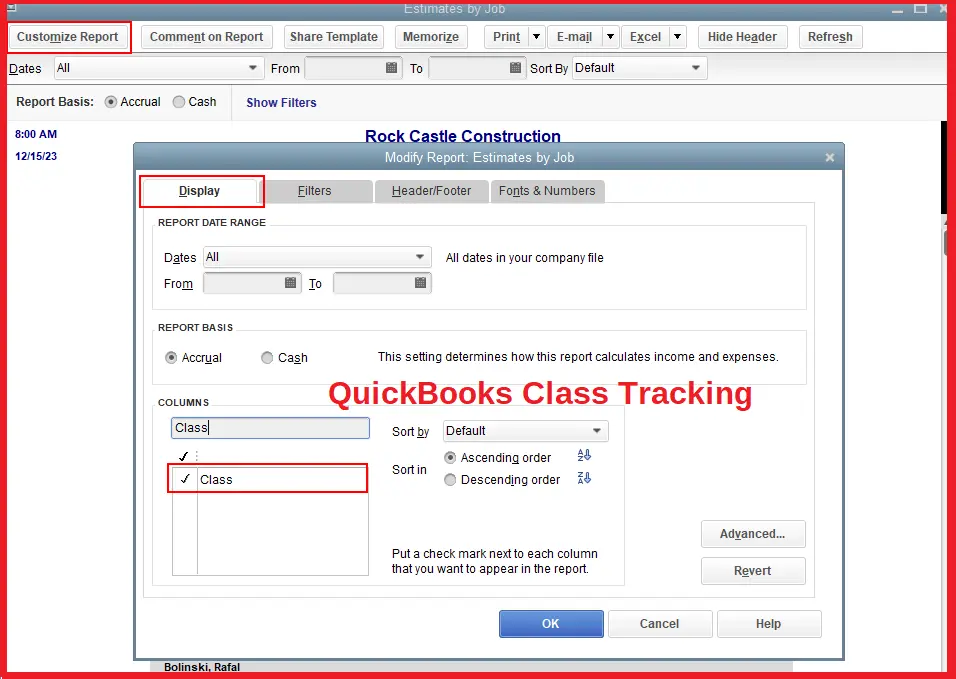
- After this, you must select the Customize Report option. From here, the next step is to navigate to the Filters menu.
- Click this menu, and from the drop-down list, you need to choose the Class option.
- Right after this, click the Multiple Classes option and tick-mark the Subclasses option of the Report you want
- Finally, complete this procedure by clicking the OK option and hitting the Refresh button.
How to Schedule a Class Report in QuickBooks?
Scheduling a class report in QuickBooks is quite useful as it allows users to automate financial data management and analyses. Also, scheduling a class report in QuickBooks streamlines the tracking and reporting process within QuickBooks. So, here we have jotted down the steps to perform, carefully follow the instructions:
- Initially, log in to your QuickBooks application and move to the QuickBooks Reports menu.
- From this menu, select the Scheduled Reports button and then the Schedule Setup.
- After this, you must choose the Report you want to send. Also, you can select multiple reports in the same schedule.
- Now, click the Next button and begin setting up the schedule of your class report. For this, firstly, name your new schedule.
- Also, set how frequently you wish to send the class report. After this, choose a Start date and Time.
- For a reminder, select the QuickBooks notify you 4 hours before it sends the class report option.
- Now, choose the Next button and prepare a scheduled reports email. After composing the email, hit the Schedule tab to complete the whole process.
- Lastly, make sure to verify the preferences are set up correctly.
Concluding Words..!
So, here’s the end of this insightful and comprehensive blog post. We hope you have learned enough about QuickBooks class tracking and how it’s impactful for your business in the long run. But, if you need any further help or professional assistance while setting up class tracking or assigning classes, just connect with us. Contact our certified support team via Live Chat Support and get instant help.
Frequently Asked Questions
Ans: Below, we have listed the transactions that you can easily assign to a class in QuickBooks:
- Sales receipt
- Estimate
- Sales order
- Statement charges
- Refunds and credits
- Check
- Credit card charges
- Bill
- Purchase order
- Paycheck
- Invoice
Ans: Yes, even non-profit organizations can make the best use of Class Tracking in QuickBooks Desktop and easily track transactions by fund, program, or grant. This helps businesses ensure that all the funds are assigned correctly and that the organization has proper financial and cash-flow management. Class Tracking also helps non-profit organizations generate reports with all the details of how much funds have been received and how they are being used, which is required for accountability and transparency.
Ans: Users can enjoy the perks listed below after using the class tracking feature in QuickBooks:
- Improved financial reporting
- Better cost allocation
- Enhanced budgeting capabilities
- Deep insight into the business performance
- Accurate allocation of transactions to specific classes
- Create budgets for each class
- Monitor your business progress
- Make adjustments as needed
Ans: Keep in mind the following things to use the QuickBooks class tracking feature better:
- Enable the By Default option of class tracking
- It’s available in QuickBooks Desktop and Online
- It filters Reports By Class
- Class tracking supports the Hierarchy
- Classes are easy to delete whenever you want
Ans: Don’t worry! If you are facing issues or doubts while setting up class tracking in your QuickBooks online application, just connect with us. You can approach us either via Live Chat or directly contact us at anytime anywhere.